CAI Home Inspection
  • Home
  • Services
    • Full Home Inspection
    • Additional Inspections >
      • Termite Inspection
      • Radon Testing
      • Mold Testing
      • Thermal Imaging
      • Sewer Scope Inspection
      • Foundation Certification
    • Areas Served >
      • Ohio >
        • Columbus, OH >
          • Circleville, OH
          • Clintonville, OH
          • Delaware, OH
          • Dublin, OH
          • Gahanna, OH
          • Grandview Heights, OH
          • Grove City, OH
          • Lancaster, OH
          • Marysville, OH
          • Lewis Center, OH
          • New Albany, OH
          • Pataskala, OH
          • Pickerington, OH
          • Plain City, OH
          • Powell, OH
          • Reynoldsburg, OH
          • Worthington, OH
          • Zanesville, OH
        • Cleveland, OH >
          • Bay Village, OH
          • Beachwood, OH
          • Bedford Heights, OH
          • Brooklyn, OH
          • Chagrin Falls, OH
          • Euclid, OH
          • Highland Heights, OH
          • Independence, OH
          • Lakewood, OH
          • North Olmstead, OH
          • Parma, OH
          • Rome, OH
          • Shaker Heights, OH
          • Solon, OH
          • Strongsville, OH
          • Westlake, OH
        • Toledo, OH >
          • Bowling Green, OH
          • Holland, OH
          • Maumee, OH
          • Perrysburg, OH
          • Swanton, OH
          • Sylvania, OH
          • Waterville, OH
        • Cincinnati, OH >
          • Blue Ash, OH
          • Hamilton, OH
          • Loveland, OH
          • Lebanon, OH
          • Mason, OH
          • Middletown, OH
          • Wyoming, OH
        • Dayton, OH >
          • Beavercreek, OH
          • Centerville, OH
          • Fairborn, OH
          • Huber Heights, OH
          • Kettering, OH
          • Miamisburg, OH
          • Springboro, OH
          • West Carrollton, OH
      • North Carolina >
        • Raleigh, NC
    • Scope of Inspection >
      • Ohio
      • North Carolina
    • Rates
  • About
    • FAQ
    • COVID-19 Update
    • Buyer Home Inspection
    • Seller Home Inspection
    • Owner Home Inspection
    • Contact Us
  • Resources
    • Inspection Library
    • Contractor Network
    • Events
  • Schedule

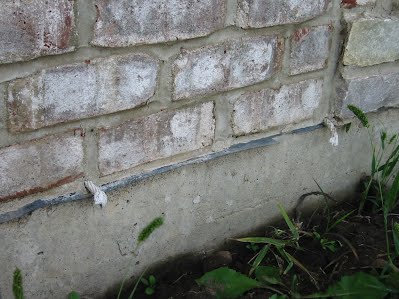
The Importance of Adequate Clearance Between Siding and Ground: Why It Matters and How to Address It

5/8/2023

 
​While it may seem like a minor concern, this lack of space can lead to significant problems for your home's exterior. In this informational blog post, we'll explore the importance of adequate clearance, the potential issues it can cause, and practical solutions to address this problem. Let's dive in and ensure that your siding has the space it needs!

Adequate clearance between the bottom edge of your siding and the ground is crucial for several reasons:
  • Moisture Protection: Sufficient clearance helps prevent moisture buildup and water infiltration into the siding. It allows for proper airflow, reducing the risk of mold, rot, and deterioration.
  • Pest Prevention: Clearing the area around the siding creates a less attractive environment for pests, such as termites or ants, that could potentially damage your home.
  • Maintenance Accessibility: Ample clearance enables easier access for routine maintenance, inspections, and repairs, avoiding the need to navigate through obstacles.

Insufficient clearance between siding and the ground can lead to various problems:
  • Moisture Damage: Without proper clearance, moisture from the ground can wick up into the siding, leading to water damage, rot, and mold growth.
  • Pest Infestation: Limited clearance provides an inviting entry point for pests, allowing them to find their way into your home's interior or cause damage to the siding.
  • Restricted Ventilation: Inadequate airflow due to close proximity to the ground can result in poor ventilation, potentially causing moisture buildup and compromising the integrity of the siding.

Fortunately, there are practical solutions to address the issue of inadequate clearance:
  • Grading and Landscaping: Ensure proper grading around your home, sloping the ground away from the foundation. This prevents water accumulation near the siding and promotes drainage.
  • Trim and Clear Vegetation: Trim back shrubs, plants, and vegetation near the siding, maintaining a minimum clearance of several inches. This creates a clear space and reduces the risk of moisture and pest issues.
  • Installation of Barrier Materials: Install a moisture-resistant barrier, such as landscaping fabric or gravel, between the ground and the siding. This helps prevent direct contact and provides additional protection against moisture.

​Don't forget the importance of regular maintenance and inspection to ensure adequate clearance:
  • Periodically inspect the area between the siding and the ground for signs of moisture damage, pest activity, or vegetation encroachment. Promptly address any issues identified.
  • Keep the area clean and free of debris, including leaves, mulch, or other materials that can trap moisture or provide a habitat for pests.
  • Consider professional assistance: If you're unsure about the proper clearance or encounter persistent issues, consult a home inspector or siding professional who can provide expert guidance and recommendations.
Maintaining adequate clearance between siding and the ground is essential for protecting your home's exterior from moisture damage, pests, and ventilation issues. By recognizing the importance of proper clearance and implementing practical solutions like grading, trimming vegetation, and installing barrier materials, you can prevent potential problems and prolong the lifespan of your siding. Regular maintenance and inspections will help identify any issues early on and allow for prompt action.

Understanding Asbestos Cement Siding: Facts, Risks, and Considerations

5/8/2023

 
A topic that has gained significant attention in the realm of home construction and renovation—asbestos cement siding. Asbestos was once a commonly used material in various building applications, including siding. In this blog post, we'll explore what asbestos cement siding is, its potential risks, how to identify it, and considerations for homeowners and renovators. Let's dive in and equip ourselves with knowledge about asbestos cement siding.

Asbestos cement siding, also known as fiber cement siding, is a type of exterior cladding that was widely used from the 1930s to the 1980s. It consists of a mixture of cement and asbestos fibers, which provided strength, durability, and resistance to fire and weather conditions. Asbestos fibers were added to enhance the siding's performance and longevity.

Asbestos is a naturally occurring mineral that, when disturbed, can release microscopic fibers into the air. Inhalation of these fibers can lead to serious health issues, including lung diseases and various forms of cancer, such as mesothelioma. While asbestos cement siding is considered relatively low risk when intact and undisturbed, it can become hazardous during renovations, repairs, or if the siding deteriorates over time.

Identifying asbestos cement siding can be challenging without professional testing, as it closely resembles other types of fiber cement siding. However, there are some indicators that may suggest the presence of asbestos:
  • Age of the Home: Asbestos cement siding was commonly used from the 1930s to the 1980s, so homes constructed during this period have a higher likelihood of containing asbestos.
  • Visual Characteristics: Asbestos cement siding typically has a smooth, textured surface with visible fibers embedded in the cement. However, visual inspection alone is not sufficient to confirm the presence of asbestos.
  • Professional Testing: To definitively determine the presence of asbestos, consult with a certified asbestos testing professional who can take samples and conduct laboratory analysis.

​If you have asbestos cement siding or are considering renovations, here are some important considerations:
  • Leave It Undisturbed: If the siding is in good condition and not deteriorating, it is generally safer to leave it undisturbed, as this minimizes the risk of asbestos fiber release.
  • Professional Handling: If you plan to remove or modify asbestos cement siding, it's crucial to hire professionals experienced in asbestos abatement. They will follow proper safety protocols to minimize the risk of asbestos exposure.
  • Testing and Monitoring: If you suspect the presence of asbestos cement siding or plan significant renovations, consider professional testing to assess the asbestos content. Regular monitoring of the siding's condition can also help identify any signs of deterioration.
  • Local Regulations: Familiarize yourself with local regulations and requirements regarding asbestos-containing materials, including disposal procedures and notification requirements for renovation projects.
Understanding asbestos cement siding, its risks, and considerations is vital for homeowners and renovators. While asbestos cement siding can be durable and pose minimal risk when intact, it's important to exercise caution during renovations or if the siding deteriorates. Professional testing, monitoring, and following proper handling procedures are crucial steps to ensure the safety of both occupants and workers. By staying informed and seeking professional guidance, you can make informed decisions regarding asbestos cement siding and maintain a safe and healthy living environment.

Understanding Stucco Cracking: Causes, Assessment, and Repair

5/8/2023

 
Stucco is a popular exterior finish known for its durability and aesthetic appeal. However, over time, cracks can develop, compromising both the appearance and functionality of the stucco. In this informational blog post, we'll explore the causes of stucco cracking, how to assess the severity of the cracks, and the available repair options. Let's dive in and equip ourselves with knowledge about stucco cracking!

Understanding the underlying causes of stucco cracking is crucial for effective prevention and repair. Some common causes include:
  • Settlement: As the building settles over time, stress can cause stucco to crack, particularly at weak points or areas with inadequate support.
  • Thermal Expansion and Contraction: Temperature fluctuations can cause stucco to expand and contract, leading to cracks, especially in regions with extreme weather conditions.
  • Improper Installation: Inadequate mix ratios, insufficient curing time, or improper application techniques during the stucco installation process can contribute to cracking.
  • Moisture Intrusion: Water infiltration due to improper flashing, poor drainage, or compromised stucco can cause the underlying materials to expand and contract, resulting in cracks.

During a visual inspection, it's essential to assess the severity of stucco cracks to determine the appropriate course of action. Consider the following factors:
  • Crack Width: Measure the width of the cracks using a ruler or measuring tape. Hairline cracks (less than 1/16 inch wide) are generally less concerning, while wider cracks may indicate structural issues.
  • Crack Pattern: Evaluate the pattern and location of the cracks. Diagonal or stair-step patterns can indicate potential structural movement, while vertical or horizontal cracks may be related to expansion or settling.
  • Water Damage: Look for signs of moisture intrusion, such as discoloration, staining, or soft spots around the cracked areas. These signs suggest the need for immediate attention.

The appropriate repair method for stucco cracks depends on the severity and underlying cause. Consider the following options:
  • Hairline Cracks: Minor, hairline cracks can often be addressed with a high-quality acrylic caulk or stucco patching compound. Clean the crack, apply the product, and ensure a smooth finish.
  • Wide or Structural Cracks: For wider or more severe cracks, consult a professional stucco contractor or a qualified home inspector. They may recommend more extensive repairs, such as removing and replacing the affected stucco section or applying a reinforcing mesh before reapplying stucco.
  • Addressing Underlying Issues: In addition to repairing the cracks, it's crucial to address the underlying causes. This may involve improving drainage, fixing flashing or sealant issues, or addressing structural concerns.

​To minimize the likelihood of future stucco cracking, consider the following preventive measures:
  • Proper Installation: Hire experienced stucco contractors who follow industry best practices and adhere to proper installation techniques.
  • Regular Maintenance: Inspect your stucco periodically for signs of damage or cracks. Promptly address any issues to prevent further damage.
  • Moisture Management: Ensure proper drainage around your home's foundation, maintain seals and flashings, and keep landscaping away from the stucco to minimize moisture-related problems.


    Understanding the causes, assessing the severity, and addressing stucco cracking is essential for maintaining the integrity and appearance of your home's exterior. By recognizing the underlying causes, such as settlement, thermal expansion, improper installation, or moisture intrusion, you can take appropriate measures to prevent or repair stucco cracks. Remember to consult professionals for a thorough assessment and expert recommendations, especially for wider or structural cracks. Taking prompt action and addressing underlying issues will help preserve the longevity of your stucco and prevent further damage. By following proper installation practices, conducting regular maintenance, and managing moisture effectively, you can minimize the risk of future stucco cracking. Stay proactive, protect your stucco, and enjoy a beautiful and durable exterior for years to come.


Understanding Blocked Weep Holes: Importance, Signs, and Solutions

5/8/2023

 
Picture
An often overlooked yet vital component of your home's exterior—weep holes. These small openings play a crucial role in preventing water buildup and ensuring proper drainage in various parts of your home. In this informational blog post, we'll explore the importance of weep holes, signs of blockage, and effective solutions to keep them clear and functioning optimally. Let's dive in and empower ourselves with knowledge about blocked weep holes!


​Weep holes are intentionally placed openings designed to facilitate drainage in areas where water accumulation may occur. Commonly found in brick walls, window sills, and exterior cladding systems, weep holes allow water to escape, preventing moisture buildup and potential damage to the structure. Understanding their importance is key to maintaining the integrity of your home's exterior.

Recognizing the signs of blocked weep holes is crucial in preventing potential water damage. Keep an eye out for the following indicators:
  • Water Stains or Discoloration: Noticeable stains or discoloration on the exterior walls, particularly around the weep hole area, may indicate water pooling behind the cladding.
  • Mildew or Mold Growth: Excessive moisture due to blocked weep holes can create an ideal environment for mildew or mold to thrive. Be attentive to any visible growth or musty odors.
  • Rotting or Deterioration: Over time, trapped moisture from blocked weep holes can lead to rotting or deterioration of the surrounding materials, such as wooden window frames or trim.

Understanding the underlying causes of weep hole blockage is crucial for effective prevention. Common culprits include:
  • Accumulated Debris: External factors like dirt, leaves, or insects can obstruct weep holes, preventing water from draining properly.
  • Improper Construction or Maintenance: In some cases, weep holes may be inadvertently covered during construction or blocked due to poor maintenance practices, such as the accumulation of caulk or paint.

​Preventing and addressing blocked weep holes is essential for maintaining proper drainage. Consider the following solutions:
  • Gentle Cleaning: Use a soft brush or a toothbrush to gently remove debris from the weep holes. Be careful not to damage the surrounding materials.
  • Clearing Pathways: Ensure that the weep holes are not obstructed by caulk, paint, or any other substances. If necessary, carefully remove any blockages without compromising the integrity of the weep hole.
  • Regular Maintenance: Incorporate routine inspection and cleaning of weep holes into your home maintenance schedule. This will help prevent blockages and address any issues promptly.
Understanding the importance of clear weep holes and recognizing the signs of blockage are essential for maintaining the integrity of your home's exterior. By keeping an eye out for water stains, mold growth, or deterioration, you can identify potential issues related to blocked weep holes. Regular cleaning and maintenance will ensure that water can effectively drain away from your home, preventing moisture-related damage. Remember, a little attention to these small openings can go a long way in protecting your home from water infiltration and maintaining its structural integrity.

Cracks in Masonry: Understanding, Assessing, and Addressing Common Issues"

5/8/2023

 
Whether you have a brick façade, stone walls, or a concrete foundation, understanding the causes and implications of masonry cracking is essential. In this blog post, we'll discuss different types of masonry cracks, their potential causes, how to assess their severity, and the necessary steps to address them. Let's delve into the world of masonry cracking and empower ourselves to protect and maintain our homes.

Not all cracks in masonry are the same, and understanding their characteristics can provide insights into potential issues. Common types of masonry cracks include:
  • Hairline Cracks: These thin, shallow cracks are typically superficial and may not pose significant structural concerns.
  • Stair-Step Cracks: Seen in brick or concrete block walls, these cracks resemble a staircase pattern and can indicate foundation settling or movement.
  • Vertical or Horizontal Cracks: These cracks often result from stress, moisture-related expansion, or movement in the masonry.
  • Diagonal Cracks: Diagonal cracks can suggest uneven settling, shifting, or issues with load-bearing walls.

Understanding the underlying causes of masonry cracking is essential to address them effectively. Common culprits include:
  • Settlement: As the ground beneath your home shifts or settles, masonry structures can experience stress, resulting in cracks.
  • Temperature and Moisture Fluctuations: Extreme weather conditions, freeze-thaw cycles, and moisture infiltration can cause masonry materials to expand and contract, leading to cracks.
  • Improper Construction or Materials: Inadequate construction techniques, use of low-quality materials, or improper mixing of mortar can contribute to cracking.

During a home inspection, it's important to assess the severity of masonry cracks to determine the appropriate course of action. Factors to consider include:
  • Width and Depth: Measure the width and depth of the crack using a ruler or measuring tape. Cracks wider than 1/8 inch or exhibiting significant depth may require further attention.
  • Structural Implications: Look for signs of structural distress, such as uneven floors, doors or windows that stick, or visible shifting in the masonry. These signs suggest a more serious issue that requires professional evaluation.
  • Patterns and Progression: Evaluate the direction, length, and progression of the cracks. Sudden changes or rapid progression may indicate active structural issues that should be addressed promptly.

​Once you've identified masonry cracks, it's important to take appropriate action to prevent further damage. Here are some steps to consider:
  • Consult a Professional: Engage a qualified mason or structural engineer to assess the severity of the cracks and provide expert recommendations.
  • Monitor and Document: Regularly monitor the cracks and document any changes or new developments. This information will be valuable for future evaluations.
  • Repairs and Reinforcements: Depending on the severity and underlying cause, repairs may involve filling cracks with suitable sealants, applying masonry patches, or implementing reinforcement techniques, such as helical ties or wall anchors.
  • Address Root Causes: If the cracks result from structural issues or foundation problems, it's crucial to address the underlying causes to prevent future cracking.

    Understanding and addressing masonry cracking is crucial for maintaining the structural integrity and aesthetics of your home. By recognizing the different types of cracks, assessing their severity, and identifying potential causes, you can take appropriate measures to address the issue. Remember, consulting with a professional mason or structural engineer is essential for accurate evaluation and expert recommendations. Whether it's filling superficial cracks, reinforcing the masonry, or addressing underlying structural issues, taking prompt action will help prevent further damage and ensure the longevity of your masonry structures. Stay vigilant, address cracks early, and enjoy a well-maintained and resilient home for years to come.

Identifying and Addressing Trim and Fascia Deterioration: A Home Inspector's Guide

5/8/2023

 
 An important aspect of your home's exterior is the trim and fascia. These components play a crucial role in both protecting your home from the elements and enhancing its overall aesthetic appeal. In this blog post, we'll explore common signs of trim and fascia deterioration, potential causes, and the importance of addressing these issues promptly. By familiarizing yourself with the signs of deterioration and understanding the underlying causes, you'll be better equipped to maintain the integrity of your home. Let's dive in and become knowledgeable about identifying and addressing trim and fascia problems


Before we dive into deterioration, let's understand the significance of trim and fascia. Trim refers to the decorative and protective elements around windows, doors, and corners, adding visual appeal and sealing gaps. Fascia, on the other hand, is the horizontal band beneath the edge of the roof, providing support for the gutter system and protecting the underlying structure. Keeping these components in good shape is vital for the overall integrity of your home.

During a home inspection, it's crucial to identify signs of trim and fascia deterioration. Here are some common indicators to watch for:
  • Peeling or Flaking Paint: Cracking, peeling, or flaking paint on trim and fascia surfaces can signal moisture intrusion or age-related wear.
  • Rotting or Softness: Gently press on the trim and fascia with your fingers. If it feels soft or spongy, it may indicate water damage or rot.
  • Discoloration or Stains: Dark stains or discoloration on the trim and fascia may indicate moisture-related issues or the presence of mold and mildew.
  • Cracks, Splitting, or Warping: Visible cracks, splitting, or warping in the trim and fascia materials are clear signs of deterioration and require attention.

Understanding the causes of trim and fascia deterioration can help address the underlying issues effectively. Common culprits include:
  • Moisture Intrusion: Improper sealing, insufficient drainage, or damaged gutters can lead to water infiltration, causing rot and deterioration.
  • Insect or Pest Infestation: Wood-boring insects, like termites, can compromise the structural integrity of trim and fascia, leading to decay and damage.
  • Exposure to Harsh Weather Conditions: Constant exposure to sun, rain, snow, and extreme temperature fluctuations can accelerate wear and tear on trim and fascia materials.

​Addressing trim and fascia deterioration promptly is crucial to prevent further damage and maintain the integrity of your home. Delayed repairs can lead to structural issues, extensive rot, and increased repair costs. As a responsible homeowner or buyer, consider the following steps:
  • Consult a Professional: Engage a qualified contractor or home inspector to assess the extent of the deterioration and provide recommendations for repairs or replacements.
  • Repair or Replace Damaged Components: Depending on the severity of the damage, your contractor may suggest repairing or replacing the deteriorated trim and fascia materials to restore their functionality and appearance.
  • Implement Preventive Measures: To prevent future deterioration, consider implementing preventive measures such as regular maintenance, proper sealing, and monitoring of moisture-prone areas.
In conclusion, the condition of trim and fascia is a vital aspect of your home's exterior. By being aware of the signs of deterioration, such as peeling paint, rot, cracks, or warping, you can catch problems early and take the necessary steps to address them. Prompt repairs and replacements are essential to prevent further damage, structural issues, and increased repair costs. Consulting with a qualified professional, such as a contractor or home inspector, is crucial to accurately assess the extent of the deterioration and receive expert recommendations. Remember, maintaining the integrity of your trim and fascia not only ensures the visual appeal of your home but also safeguards it from moisture-related issues and pests. Stay vigilant, address issues promptly, and enjoy a beautiful and well-protected home for years to come.

Understanding Warped Vinyl Siding: Causes, Prevention, and Solutions

5/6/2023

 
When it comes to vinyl siding, heat can be both a friend and a foe. While vinyl siding is designed to withstand various weather conditions, excessive heat can sometimes cause warping, leading to aesthetic and functional issues. In this blog post, we'll delve into the causes of warped vinyl siding, explore preventive measures, and discuss possible solutions. Let's dive in and learn how to keep your vinyl siding in top shape, even under the scorching sun!

Vinyl siding is known for its durability, but extreme heat can cause it to warp. When exposed to high temperatures, vinyl siding expands, leading to distortion and warping. The severity of warping can vary based on factors such as the intensity and duration of the heat exposure, the quality of the siding material, and the installation techniques employed. It's essential to understand these factors to address and prevent warping effectively.

To minimize the risk of warped vinyl siding, prevention plays a crucial role. Here are some preventive measures you can take:
  • Provide Sufficient Clearance: Ensure that there is adequate clearance between heat-emitting sources like grills, barbecues, and heat vents, and the vinyl siding. This distance allows for proper ventilation and prevents direct heat transfer.
  • Install Shading Elements: Consider installing shade-producing elements such as awnings, trees, or shrubs near the areas of your home with vinyl siding. These additions can provide relief from direct sunlight and reduce heat absorption.
  • Choose Lighter Colors: Opt for lighter-colored vinyl siding, as darker hues tend to absorb more heat. Lighter shades reflect sunlight, helping to keep the siding cooler and reducing the risk of warping.
  • Maintain Proper Ventilation: Ensure proper airflow and ventilation around your home's exterior. Adequate ventilation helps dissipate heat, preventing it from getting trapped behind the siding.

​If you notice signs of warped vinyl siding, it's essential to take action promptly to prevent further damage. Here are some potential solutions:
  • Professional Assessment: Contact a qualified contractor or home inspector with experience in siding to assess the extent of the warping and identify the underlying causes. Their expertise will guide you in determining the appropriate course of action.
  • Replacement of Affected Panels: In cases of severe warping, replacement of the affected panels may be necessary. This ensures that the overall aesthetic appeal and functionality of your siding are restored.
  • Reinforcement and Repair: For minor warping, reinforcement and repair techniques can be employed. This may involve adjusting or reinforcing the existing siding to minimize the appearance of warping and improve its overall integrity.
  • Future Prevention Measures: After addressing the warped siding, it's crucial to implement preventive measures to mitigate the risk of future warping. This includes following the preventive measures mentioned earlier, such as maintaining proper clearance, shading, ventilation, and color selection.
Vinyl siding can sometimes experience warping due to excessive heat exposure. Understanding the causes, implementing preventive measures, and taking prompt action when warping occurs are key to maintaining the integrity and appearance of your siding. By following the preventive tips provided and seeking professional guidance when needed, you can keep your vinyl siding looking its best, even under the scorching heat of summer. Remember, a little prevention goes a long way in preserving the beauty and functionality of your vinyl siding!

advantages of vinyl sidings

4/24/2023

 
Picture
For homeowners searching for long-lasting and low-maintenance exterior cladding, vinyl siding has grown in popularity. It is simpler for homeowners to select one that matches their aesthetic tastes because they are available in a variety of forms and colors. However, vinyl sidings are quite important in evaluating the state of the property's exterior when it comes to home inspections. We'll talk about vinyl siding's advantages and how they relate to home inspections in this blog. Vinyl sidings are extremely robust and resistant to adverse weather because they are constructed of PVC (polyvinyl chloride) resin. They don't need to be painted or stained, unlike typical wood siding, therefore they are very minimal maintenance.  

Vinyl sidings are a cost-effective option for homes since they can withstand damaging UV rays, dampness, and insects. Vinyl sidings are carefully examined during home inspections for any indications of deterioration, such as cracks, dents, or chips. Numerous factors, such as hailstorms, powerful winds, or simply normal wear and tear, can cause these damages. Since water infiltration can seriously harm a home's structural integrity, inspectors also search for indications of water damage, such as mold development or discoloration. Installing vinyl siding is a crucial factor that inspectors check for. A number of issues, including air and water intrusion, which can harm the structure of the property and result in excessive energy costs, might arise from improper installation. 

The longevity of vinyl siding is one of its key advantages. It is built to withstand inclement weather like intense rain, powerful winds, and freezing temperatures. It is a long-lasting option for home exteriors because it is also resistant to insect damage, rust, and corrosion. The importance of this durability for home inspections is highlighted by the fact that a well-kept outside can assist prevent moisture ingress, which can result in mold growth and other problems. Vinyl siding's low maintenance requirements are an additional advantage. Vinyl siding may be easily cleaned with a power washer and light detergent, unlike wood siding, which needs regular painting and staining. Homeowners can choose this since it reduces the need for ongoing upkeep and maintenance, which lowers the expense. Additionally, vinyl siding won't fade over time, maintaining its color and appearance. 

In conclusion, vinyl siding is an excellent alternative for homeowners looking for an exterior cladding material that is long-lasting, low-maintenance, and affordable. Vinyl siding is a sensible option for home inspections because it is simple to evaluate and can help stop moisture ingress and other problems. If you're thinking of installing vinyl siding on your house, make sure to select a dependable contractor that can guarantee appropriate installation and upkeep for many years.

IMPORTANCE OF SIDINGS IN YOUR HOUSE

4/20/2023

 
Picturesource: rooworksinc.com
A home's exterior is incomplete without siding. It improves the property's curb appeal and acts as a barrier from the weather. However, siding can deteriorate or become loose with time, just like any other component of a house, which can cause a number of issues. We'll talk about the effects of damaged or loose siding on a house in this blog post, as well as how home inspections may assist spot and prevent such problems.

Damage or Loose Siding: Causes and Consequences
Age: Siding is more vulnerable to corrosion and degradation as it gets older. It might eventually split, distort, or become brittle, which would make it more vulnerable to problems like wind damage.

Weather: Adverse weather can harm siding, including hail, torrential rain, and strong winds. Siding can weaken and deteriorate over time as a result of exposure to harsh weather, making it more vulnerable to further harm.

Installation errors: If siding is not installed correctly, it may be vulnerable to tearing or other damage. Another consequence of poor installation is gaps between the siding and the home, which can let moisture soak in and harm the structure.

Lack of maintenance: Siding can get dusty, stained, and discolored without routine care. This can weaken and weaken the siding over time, making it more vulnerable to harm.

Damaged or loose siding can cause a number of problems if ignored, such as:

Water damage: Loose or broken siding can allow water to seep into a home's walls, harming the structure and fostering the growth of mold. Gaps in siding can cause air to infiltrate into the home, resulting in energy loss and higher energy costs.

Infestations of pests: A home's loose siding might serve as a point of entry for insects and rats.

Curb appeal: A house's curb appeal and value can be negatively impacted by damaged or loose siding.

Inspectors will search for damage or deterioration indicators like cracks, warping, or discolouration. Additionally, they'll be on the lookout for any indications of loose or missing material as well as any openings or cracks in the siding that can let moisture or vermin inside the property. If the inspector finds any siding problems, they will note them in the inspection report along with suggestions for replacement or repair.

Homebuyers can use the findings of a home inspection to bargain with the seller for repairs or a reduced asking price. The knowledge can be used by homeowners to spot siding problems and take preventative action to fix them before they worsen.

Even while damage or loose siding might appear like a minor problem, if ignored, it can have serious effects on a house. A crucial tool for locating problems with siding and other parts of a property is a home inspection. Homeowners can make sure that their houses are secure, energy-efficient, and beautiful for many years by taking quick action to solve these problems.

Damaged or loose sliding doors

4/20/2023

 
Modern homes frequently have sliding doors as a design element. They offer a smooth transition between indoor and outdoor living areas and permit an abundance of natural light inside the home. However, sliding doors are subject to wear and damage just like any mechanical systems. A malfunctioning sliding door can be inconvenient and even dangerous. This blog post will discuss the problem of a broken sliding door and how home inspections are related to it.

Numerous problems can lead to a broken sliding door. The tracks and rollers' wear and tear is one of the most frequent causes. Over time, dirt and debris can gather in the tracks, clogging the rollers and making it difficult for the door to go open and shut. A track that is out of alignment or deformed might cause the door to jam or become stuck, which is another common problem. It can be more than just a hassle. It may also be dangerous to your safety. In an emergency, a jammed door may make it impossible for residents to leave the building. A door that is challenging to open or close might also provide a danger to small children or elderly people who may find it difficult to use.

The process of purchasing a home must include home inspections. Before a buyer makes an offer, a thorough examination might reveal potential issues with a home. This can assist purchasers in avoiding unforeseen maintenance expenses and guarantee that the house is secure and livable.
The condition of the house, including the doors and windows, will be assessed by the inspector during a home inspection. This involves looking for evidence of deterioration on the sliding door tracks and rollers. If a sliding door has a problem, the inspector will normally advise the buyer to see a specialist to identify the degree of the issue and the best course of action.

Home inspections are crucial for everyone, not just purchasers. Sellers may also benefit from them. Before marketing their property, sellers can find out if there are any potential problems and take care of them before they become a negotiating point. A faulty sliding door is a frequent issue that can endanger safety and frustrate homeowners. Sliding door problems can sometimes be avoided with routine maintenance, but occasionally repairs are required. The condition of the house, including the doors and windows, will be assessed by inspectors during a home inspection in order to spot any potential issues. Homeowners can guarantee that their property is secure and livable and buyers can prevent surprise repair expenditures by taking care of concerns as soon as they arise.
<<Previous
Forward>>

    Categories

    All
    Air Conditioning
    Aluminum
    Asbestos
    Asbestos Cement Siding
    Blocked Weep Holes
    Bowed/Leaning Walls
    Carbon Monoxide
    Clearance Between Siding And Ground
    Doors
    Egress
    Electrical
    Energy Efficiency
    Fire Rating
    Floating Floors
    Floors
    Foundations
    Gaps In Flashing
    Garage Door
    Gas Line
    Gutter Maintenance
    Insects
    Knob And Tube
    Locks
    Missing/Deteriorated Exterior Caulking
    Moisture
    Mold
    Mortar Gaps
    Outlet
    Painting And Sealing Exposed Wood
    Pests
    Plumbing
    Polybutylene
    Radon
    Roof System
    Smoke Alarm
    Stucco Cracking
    Stucco Issues
    Sump Pump
    Trim And Fascia Deterioration
    Vents
    Vines On Exterior Walls
    Vinyl Siding
    Warped Vinyl Siding
    Warped Wood Siding
    Water Intrusion
    Windows

    RSS Feed


    Matthew Kiefer, EzineArticles Basic Author
     

Read Our Reviews!

Picture

Picture
Picture
Picture
Picture
Picture
Picture

Our Primary Office Locations in Ohio & North Carolina


Raleigh, NC
3052 Cinder Bluff Dr
Raleigh, NC 27603
​984-261-2787

Cleveland, Ohio
16115 Waterloo Rd
​Cleveland, OH 44110
216-672-6185
Dublin, Ohio (main)
6214 Inishmore Ln
Dublin, Ohio 43017
​614-364-3829

Dayton, Ohio
60 Camden Park Ct
Springboro, OH 45066
​937-396-5239
Cincinnati, Ohio
5605 Bridgetown Rd #10
Cincinnati, OH 45248
​513-306-4640

Toledo, Ohio
478 Dearborn Ave.
Toledo, Ohio 43605
419-329-4623

Ohio Service Areas

CINCINNATI
BLUE ASH
HAMILTON
LEBANON
LOVELAND
MASON
MIDDLETOWN
WYOMING
CLEVELAND
BAY VILLAGE
BEACHWOOD
BEDFORD
BROOKLYN
CHAGRIN FALLS
EUCLID
HIGHLAND HEIGHTS
INDEPENDENCE
LAKEWOOD
NORTH OLMSTEAD
PARMA
ROME
SHAKER HEIGHTS
SOLON
​STRONGSVILLE
WESTLAKE
Columbus
CIRCLEVILLE
CLINTONVILLE
DELAWARE
DUBLIN
GAHANNA
GRANDVIEW HEIGHTS
GROVE CITY
LANCASTER
LEWIS CENTER
MARYSVILLE
NEW ALBANY
PATASKALA
PICKERINGTON
PLAIN CITY
POWELL
REYNOLDSBURG
WORTHINGTON
ZANESVILLE
Dayton
BEAVERCREEK
CENTERVILLE
FAIRBORN
HUBER HEIGHTS
KETTERING
MIAMISBURG
SPRINGBORO
WEST CARROLLTON
Toledo
​BOWLING GREEN
​
HOLLAND
​
MAUMEE
​
PERRYSBURG
SWANTON
SYLVANIA
WATERVILLE

North Carolina Service Areas​

Raleigh
Holly Springs
Fuquay-Varina
Angier
Mt. Pleasant
Smithfield
Clayton
Knightdale
Zebulon
Rollsville
Wake Forest
Youngsville
Morrisville
Carey
Apex
Durham
Chapel Hill
Pittsboro
Mebane
Greensboro
High Point
Ashboro
Winston-salem
Huntsville
Clemmons
Wilmington
Wrightsboro
Kings Grant
Myrtle Grove
Sea Breeze
Carolina Beach
Kure Beach
Leland
Castle Hayne

Contact us at: 888-301-3186
Careers | Services 
© 2023 - CAI Home Inspection. All rights reserved. 
Privacy Policy.
  • Home
  • Services
    • Full Home Inspection
    • Additional Inspections >
      • Termite Inspection
      • Radon Testing
      • Mold Testing
      • Thermal Imaging
      • Sewer Scope Inspection
      • Foundation Certification
    • Areas Served >
      • Ohio >
        • Columbus, OH >
          • Circleville, OH
          • Clintonville, OH
          • Delaware, OH
          • Dublin, OH
          • Gahanna, OH
          • Grandview Heights, OH
          • Grove City, OH
          • Lancaster, OH
          • Marysville, OH
          • Lewis Center, OH
          • New Albany, OH
          • Pataskala, OH
          • Pickerington, OH
          • Plain City, OH
          • Powell, OH
          • Reynoldsburg, OH
          • Worthington, OH
          • Zanesville, OH
        • Cleveland, OH >
          • Bay Village, OH
          • Beachwood, OH
          • Bedford Heights, OH
          • Brooklyn, OH
          • Chagrin Falls, OH
          • Euclid, OH
          • Highland Heights, OH
          • Independence, OH
          • Lakewood, OH
          • North Olmstead, OH
          • Parma, OH
          • Rome, OH
          • Shaker Heights, OH
          • Solon, OH
          • Strongsville, OH
          • Westlake, OH
        • Toledo, OH >
          • Bowling Green, OH
          • Holland, OH
          • Maumee, OH
          • Perrysburg, OH
          • Swanton, OH
          • Sylvania, OH
          • Waterville, OH
        • Cincinnati, OH >
          • Blue Ash, OH
          • Hamilton, OH
          • Loveland, OH
          • Lebanon, OH
          • Mason, OH
          • Middletown, OH
          • Wyoming, OH
        • Dayton, OH >
          • Beavercreek, OH
          • Centerville, OH
          • Fairborn, OH
          • Huber Heights, OH
          • Kettering, OH
          • Miamisburg, OH
          • Springboro, OH
          • West Carrollton, OH
      • North Carolina >
        • Raleigh, NC
    • Scope of Inspection >
      • Ohio
      • North Carolina
    • Rates
  • About
    • FAQ
    • COVID-19 Update
    • Buyer Home Inspection
    • Seller Home Inspection
    • Owner Home Inspection
    • Contact Us
  • Resources
    • Inspection Library
    • Contractor Network
    • Events
  • Schedule